



PINK CHAMPAGNE CAKE
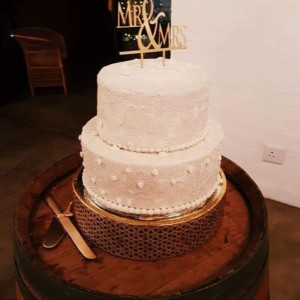
Made this wedding cake for my son’s wedding.
This Pink Champagne Cake is the perfect way to celebrate any occasion or holiday! A champagne infused cake with a classic vanilla buttercream.
Total Time: 2 hours 25 minutes
Servings 12
1 1/2 cups all-purpose flour
1 1/2 tsps baking powder
1/2 tsp salt
1/2 cup unsalted butter room temperature
1 cup granulated sugar
3 large egg whites room temperature
1 tsp vanilla
3/4 cup pink champagne or sparkling wine
Fuschia color gel
Vanilla Buttercream:
4 large egg whites
1 1/4 cups granulated sugar
1 1/2 cups unsalted butter room temperature, cubed
1 tsp clear vanilla extract *** ( warm the vanilla essence slightly before adding otherwise I found the buttercream prone to split)
Fuschia color gel
Assembly:
2 jars of cake sparkles or 1 jar sanding sugar
Wilton tip 1M
Wilton tip 12
US Customary – Metric
Cake:
Preheat oven to 350°F and grease and flour three 6″ cake rounds, line with parchment.
In a medium bowl, whisk flour, baking powder, and salt. Set aside.
Using a stand mixer fitted with the paddle attachment, beat butter until smooth. Add sugar and beat on med-high until pale and fluffy (2-3 mins).
Reduce speed and add egg whites one at a time, fully incorporating after each addition. Add vanilla.
Alternate adding flour mixture and champagne, beginning and ending with flour (3 additions of flour and 2 of champagne). Fully incorporating after each addition.
Add a small amount of Fuschia color gel using a toothpick. Mix to incorporate but try not to overmix.
Spread batter evenly into prepared pans. Smooth the tops with a spatula.
Bake for approx. 25 mins or until a toothpick inserted into the center comes out mostly clean.
Place cakes on wire rack to cool for 10 mins then turn out onto wire rack to cool completely.
Vanilla Buttercream:
Place egg whites and sugar into the bowl of a stand mixer, whisk until combined.*
Place bowl over a hot water bath on the stove and whisk constantly until the mixture is hot and no longer grainy to the touch (approx. 3 mins).
Place bowl on your stand mixer and whisk on med-high until the meringue is stiff and cooled (the bowl is no longer warm to the touch (approx. 5-10 mins)).
Switch to paddle attachment. Slowly add cubed butter and mix until smooth. Add vanilla and continue to whip until smooth.**
Assembly:
Place one layer of cake on a cake stand or serving plate. Top with approximately 2/3 cup of frosting and spread evenly. Repeat with remaining layers and apply a thin coat of frosting all over the cake. Chill for 20 mins.
Frost and smooth the sides. Chill for 20 mins.
Using a toothpick, add a small amount of Fuschia color gel to the remaining frosting. Stir with a spatula to incorporate, or place back on the stand mixer to mix in the color.
Gently press cake sparkles or sanding sugar into the sides and top of the cake.***
Decorate with pink rosettes on top and beads along the bottom if desired.
NOTES
* Ensure there is NO trace of egg yolks in your whites and that your mixer bowl and whisk is completely grease free or your meringue won’t stiffen.
** The buttercream may look like it’s curdled at some point. Keep mixing until it is completely smooth.
*** It’s easiest to do this if the cake is on a cake board and you can place it on an upside-down glass or bowl so the edges hang over. Adapted from My Cake School.
Photo and recipe posted by Dot Marais Hardick
More notes:
I made 4 individual batches of the recipe. Once the batches were mixed I poured 2 lots into a bowl, giving it a light stir to combine the two- poured the double batch into a large 28 loose bottom cake tin which I had sprayed, then lined. The baking time I doubled. Once cooked and slightly cooled, I removed the outer ring of the baking tin and placed a cutting board on top of the side facing up to level the cake. Thereafter I divided and cut each cake into 3 rounds for stacking and decorating.
The recipe is definitely a Swiss meringue frosting. It’s an awesome frosting.
Recipe posted by Dot Marais Hardick
Photo: Dot Marais Hardick


geskuif